MIPI screen TFT08006 support
Screen introduction
TFT080006 officially supports analog PI screen, 8 inches, resolution 800*1280. The official package supports playback.
Download
MIPI screen TFT08006 patch: https://www.aw-ol.com/downloads/resources/27
MIPI screen TFT08006 related information, please refer to: https://www.aw-ol.com/downloads/resources/28
getevent demo, used for D1-H button or screen touch test: https://www.aw-ol.com/downloads/resources/26
Debugging method
1.【Only required for internal test v0.5】Copy the configs.patch file to the tina/device/config/chips/d1 directory,
git apply configs.patch
add patch
2.【Only required for internal test v0.5*】Copy the 0001-K1-sun20iw1p1-P2-disp-add-tft08006-panel-driver.patch file under uboot to tina/lichee/brandy-2.0/u -boot-2018 directory,
git apply 0001-K1-sun20iw1p1-P2-disp-add-tft08006-panel-driver.patch
add patch
3.【Only required for internal test v0.5* version】Copy the 0001-K1-sun20iw1p1-P2-disp-add-tft08006-panel-driver.patch file under the kernel to the tina/lichee/linux-5.4 directory ,
git apply 0001-K1-sun20iw1p1-P2-disp-add-tft08006-panel-driver.patch
add patch
4.make kernel_menuconfig selected
│ Symbol: LCD_SUPPORT_TFT08006 [=y]                                                                                                                                                                     │
  │ Type  : bool                                                                                                                                                                                          │
  │ Prompt: LCD support TFT08006 panel                                                                                                                                                                    │
  │   Location:                                                                                                                                                                                           │
  │     -> Device Drivers                                                                                                                                                                                 │
  │       -> Graphics support                                                                                                                                                                             │
  │         -> Frame buffer Devices                                                                                                                                                                       │
  │           -> Video support for sunxi                                                                                                                                                                  │
  │ (1)         -> LCD panels select                                                                                                                                                                      │
  │   Defined at drivers/video/fbdev/sunxi/disp2/disp/lcd/Kconfig:178                                                                                                                                     │
  │   Depends on: HAS_IOMEM [=y] && FB [=y] && DISP2_SUNXI [=y]
All other items in the directory can be deselected
5.Select in make menuconfig:
Kernel modules > Input modules > <*> kmod-touchscreen-gt9xxnew
6.Touch demo make menuconfig and select Utilities-->getevent to run getevent on the device side, and then touch the screen to print the touched screen coordinate value. There is a getevent_d1 demo in the patch compression package, and you can directly push its adb to the device to run
Touch the screen after running, if it is normal, it will print as follows:
root@TinaLinux:/# ./getevent_d1
add device 1: /dev/input/event2
  name:     "gt9xxnew_ts"
add device 2: /dev/input/event1
  name:     "audiocodec sunxi Audio Jack"
add device 3: /dev/input/event0
  name:     "sunxi-keyboard"
poll 4, returned 1
/dev/input/event2: 0001 014a 00000001
poll 4, returned 1
/dev/input/event2: 0003 0035 0000016a
poll 4, returned 1
/dev/input/event2: 0003 0036 00000091
poll 4, returned 1
/dev/input/event2: 0003 0030 00000019
poll 4, returned 1
/dev/input/event2: 0003 0032 00000019
poll 4, returned 1
/dev/input/event2: 0003 0039 00000000
poll 4, returned 1
/dev/input/event2: 0000 0002 00000000
poll 4, returned 1
/dev/input/event2: 0000 0000 00000000
poll 4, returned 1
/dev/input/event2: 0003 0035 0000016a
poll 4, returned 1
/dev/input/event2: 0003 0036 00000091
poll 4, returned 1
……
V1.0 version supports display
The Tina D1-H V1.0 version does not support backlight adjustment. The screen sold in the current Taobao store may not light up. The following modifications are required:
Modify the lcd_pwm_freq in the lcd0 node from tina/device/config/chips/d1/configs/nezha/linux-5.4/board.dts to
lcd_pwm_freq        = <1000>;
V1.01 and subsequent versions can directly use the screen and adjust the backlight.
Backlight brightness adjustment method
mount -t debugfs none /sys/kernek/debug;
cd /sys/kernel/debug/dispdbg;

/* Set the backlight brightness to 100 */
echo lcd0 > name;echo setbl > command;echo 100 > param;echo 1 > start;
/* Set the backlight brightness to 0 */
echo lcd0 > name;echo setbl > command;echo 0 > param;echo 1 > start;
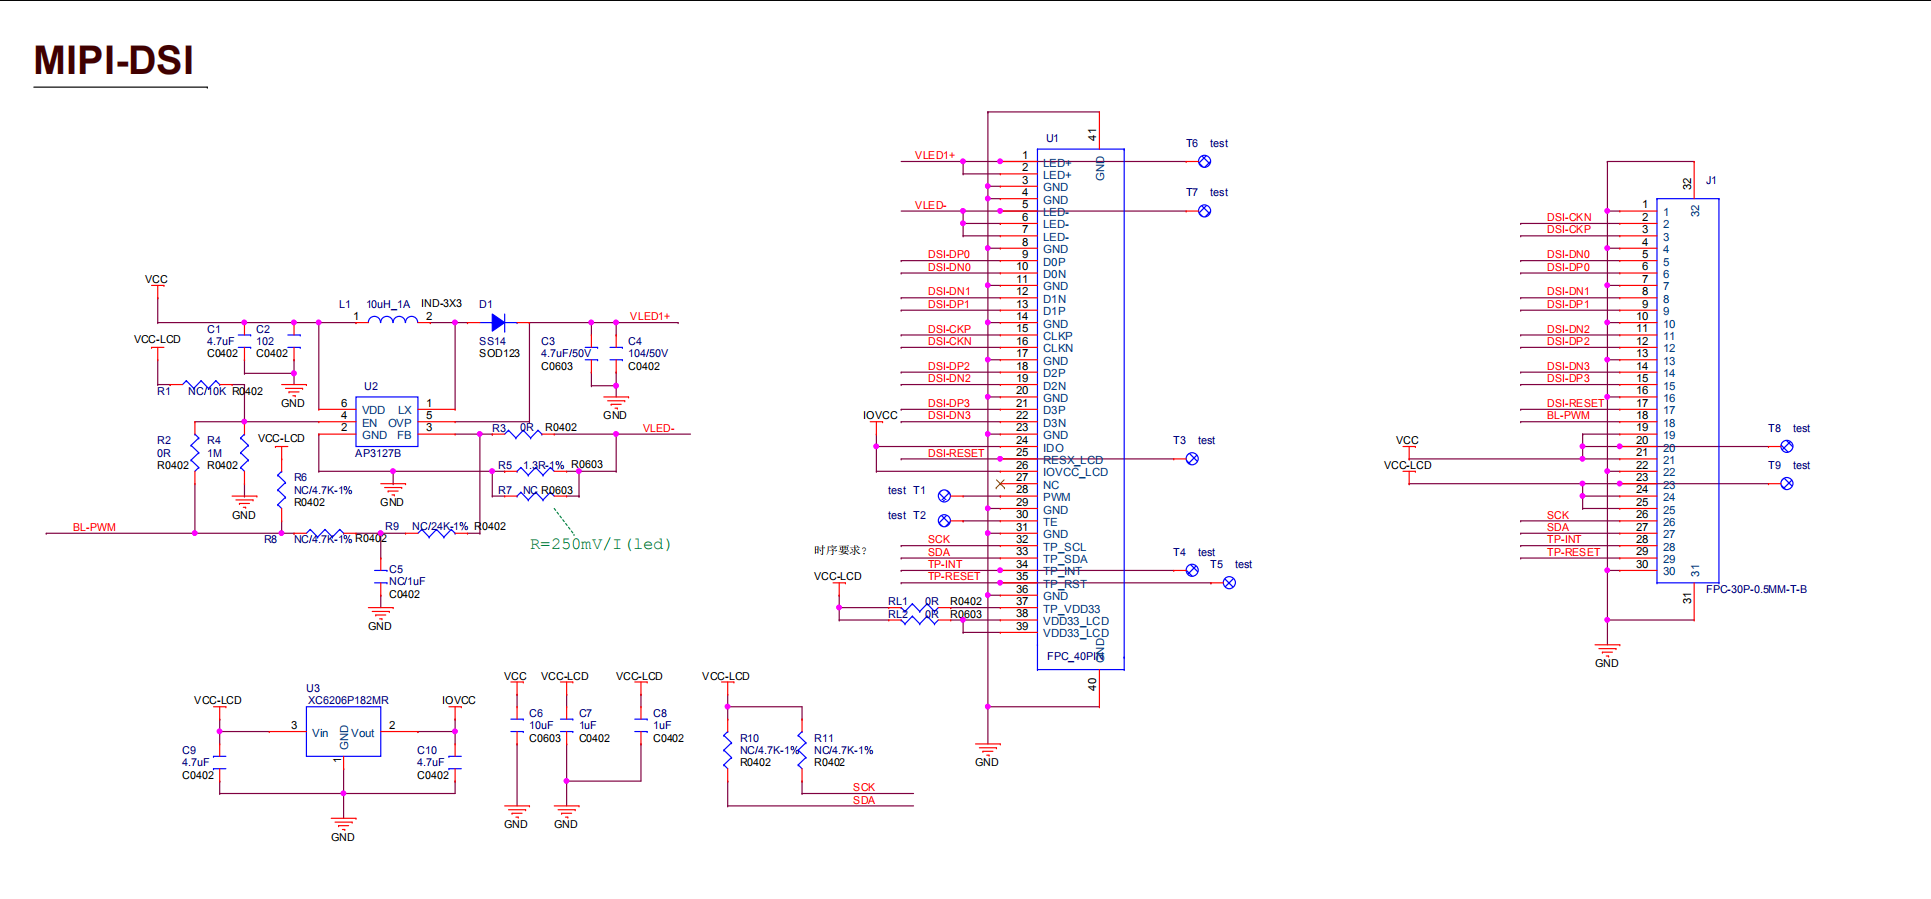
If the above command cannot adjust the brightness of the backlight, you need to check the hardware of the screen adapter board: Combining the schematic diagram of the screen adapter board, connect R6 of the backlight module to a 1K resistor (note that the resistance value of R4 is ≥10K or leave it blank, and R7 is set air)
Schematic diagram of adapter board